Instalando Ovirt 4.0 Hosted Engine Utilizando NFS
Objetivo
Instalar Ovirt 4.0 Hosted Engine utilizando NFS
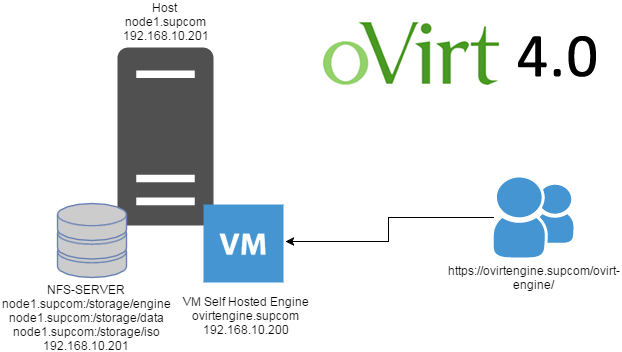
No meu ambiente instalei tudo em um único node, o ovirt engine como VM no meu primeiro node, juntamente com NFS, mas para ambiente maiores recomendo a separação dos componentes para obter uma melhor performance e HA.
Ambiente Utilizado
- NODE1 FÍSICO: Intel Xeon 24 Core(Hyper-Threading) - 32G - CentoOS 7-x86_64-minimal
- NFS STORAGE - 500GB
- VM OVIRT MANAGER - Quad core, 16 GB RAM e 50 GB
- SELINUX Desabilitado
- NTP configurado
Necessário servidor DNS, mas utilizei local para esta instalação
# cat /etc/hosts

192.168.10.200  ovirtengine.supcom
192.168.10.201  node1.supcom
Instando e configurando NFS
# yum -y install nfs-utils

# mkdir -p /storage/{engine,data,iso}

# chown 36:36 /storage/{engine,data,iso}

# cat /etc/exports

/storage/engine 192.168.10.0/24(rw,anonuid=36,anongid=36,all_squash)
/storage/data   192.168.10.0/24(rw,anonuid=36,anongid=36,all_squash)
/storage/iso    192.168.10.0/24(rw,anonuid=36,anongid=36,all_squash)

# exportfs -a

# systemctl enable nfs-server.service
# systemctl restart nfs-server.service

# showmount -e
Export list for node1.supcom:
/storage/engine *
/storage/data   *
/storage/iso*
Instalando pacotes necessários
# yum install http://resources.ovirt.org/pub/yum-repo/ovirt-release40.rpm
# yum install ovirt-hosted-engine-setup ovirt-engine-appliance -y
Iniciando deploy hosted engine
# hosted-engine --deploy
[ INFO  ] Stage: Initializing
[ INFO  ] Generating a temporary VNC password.
[ INFO  ] Stage: Environment setup
  During customization use CTRL-D to abort.
  Continuing will configure this host for serving as hypervisor and create a VM where you have to install the engine afterwards.
Are you sure you want to continue? (Yes, No)[Yes]: Yes
  It has been detected that this program is executed through an SSH connection without using screen.
  Continuing with the installation may lead to broken installation if the network connection fails.
  It is highly recommended to abort the installation and run it inside a screen session using command "screen".
Do you want to continue anyway? (Yes, No)[No]: Yes
[ INFO  ] Hardware supports virtualization
  Configuration files: []
  Log file: /var/log/ovirt-hosted-engine-setup/ovirt-hosted-engine-setup-20161118133413-u1wg2v.log
  Version: otopi-1.5.2 (otopi-1.5.2-1.el7.centos)
[ INFO  ] Stage: Environment packages setup
[ INFO  ] Stage: Programs detection
[ INFO  ] Stage: Environment setup
[WARNING] Cannot locate gluster packages, Hyper Converged setup support will be disabled.
[ INFO  ] Please abort the setup and install vdsm-gluster, gluster-server >= 3.7.2 and restart vdsmd service in order to gain Hyper Converged setup support.
[ INFO  ] Stage: Environment customization

  --== STORAGE CONFIGURATION ==--
Please specify the storage you would like to use (glusterfs, iscsi, fc, nfs3, nfs4)[nfs3]: nfs3
Please specify the full shared storage connection path to use (example: host:/path): 192.168.10.201:/storage/engine
[ INFO  ] Installing on first host

  --== SYSTEM CONFIGURATION ==--


  --== NETWORK CONFIGURATION ==--

[ INFO  ] Bridge ovirtmgmt already created
iptables was detected on your computer, do you wish setup to configure it? (Yes, No)[Yes]: Yes
Please indicate a pingable gateway IP address [192.168.10.1]: 192.168.10.1
 --== VM CONFIGURATION ==--

      Booting from cdrom on RHEL7 is ISO image based only, as cdrom passthrough is disabled (BZ760885)
Please specify the device to boot the VM from (choose disk for the oVirt engine appliance) (cdrom, disk, pxe) [disk]: disk
Please specify the console type you would like to use to connect to the VM (vnc, spice) [vnc]: vnc
[ INFO  ] Detecting available oVirt engine appliances
  The following appliance have been found on your system:
[1] - The oVirt Engine Appliance image (OVA) - 4.0-20161115.1.el7.centos
[2] - Directly select an OVA file
Please select an appliance (1, 2) [1]: 1
[ INFO  ] Verifying its sha1sum
[ INFO  ] Checking OVF archive content (could take a few minutes depending on archive size)
[ INFO  ] Checking OVF XML content (could take a few minutes depending on archive size)
[WARNING] OVF does not contain a valid image description, using default.
Would you like to use cloud-init to customize the appliance on the first boot (Yes, No)[Yes]? Yes
Would you like to generate on-fly a cloud-init ISO image (of no-cloud type) or do you have an existing one (Generate, Existing)[Generate]? Generate
      Please provide the FQDN you would like to use for the engine appliance.
      Note: This will be the FQDN of the engine VM you are now going to launch,
      it should not point to the base host or to any other existing machine.
Engine VM FQDN: (leave it empty to skip): []: ovirtengine.supcom
Automatically execute engine-setup on the engine appliance on first boot (Yes, No)[Yes]? No
    Please provide the domain name you would like to use for the engine appliance.
    Engine VM domain: [supcom]

      Enter root password that will be used for the engine appliance (leave it empty to skip):
      Confirm appliance root password:
      The following CPU types are supported by this host:
             - model_SandyBridge: Intel SandyBridge Family
             - model_Westmere: Intel Westmere Family
             - model_Nehalem: Intel Nehalem Family
             - model_Penryn: Intel Penryn Family
             - model_Conroe: Intel Conroe Family
      Please specify the CPU type to be used by the VM [model_SandyBridge]:
      Please specify the number of virtual CPUs for the VM (Defaults to appliance OVF value): [4]:
      [WARNING] Minimum requirements for disk size not met
      You may specify a unicast MAC address for the VM or accept a randomly generated default [00:16:3e:77:82:77]:
      Please specify the memory size of the VM in MB (Defaults to appliance OVF value): [16384]:
How should the engine VM network be configured (DHCP, Static)[DHCP]? Static Please enter the IP address to be used for the engine VM [192.168.10.2]: 192.168.10.200
      [ INFO  ] The engine VM will be configured to use 192.168.10.200/24
      Please provide a comma-separated list (max 3) of IP addresses of domain name servers for the engine VM
Engine VM DNS (leave it empty to skip) [8.8.8.8]: 8.8.8.8
Add lines for the appliance itself and for this host to /etc/hosts on the engine VM?
Note: ensuring that this host could resolve the engine VM hostname is still up to you (Yes, No)[No] Yes
      --== HOSTED ENGINE CONFIGURATION ==--

      Enter engine admin password:
      Confirm engine admin password:
      Enter the name which will be used to identify this host inside the Administrator Portal [hosted_engine_1]: node1-engine
      Please provide the name of the SMTP server through which we will send notifications [localhost]:
      Please provide the TCP port number of the SMTP server [25]:
      Please provide the email address from which notifications will be sent [root@localhost]:
      Please provide a comma-separated list of email addresses which will get notifications [root@localhost]:
        [ INFO  ] Stage: Setup validation

      --== CONFIGURATION PREVIEW ==--

      Bridge interface                   : em2
      Engine FQDN                        : ovirtengine.supcom
      Bridge name                        : ovirtmgmt
      Host address                       : node1.supcom
      SSH daemon port                    : 22
      Firewall manager                   : iptables
      Gateway address                    : 192.168.10.1
      Host name for web application      : node1-engine
      Storage Domain type                : nfs3
      Host ID                            : 1
      Image size GB                      : 10
      Storage connection                 : 192.168.10.201:/storage/engine
      Console type                       : vnc
      Memory size MB                     : 16384
      MAC address                        : 00:16:3e:17:ac:23
      Boot type                          : disk
      Number of CPUs                     : 4
      OVF archive (for disk boot)        : /usr/share/ovirt-engine-appliance/ovirt-engine-appliance-4.0-20161115.1.el7.centos.ova
      Appliance version                  : 4.0-20161115.1.el7.centos
      Restart engine VM after engine-setup: True
      CPU Type                           : model_SandyBridge
Acima o resumo da minha configuração, mude o que achar necessário conforme seu ambiente.
Please confirm installation settings (Yes, No)[Yes]: Yes
    [ INFO  ] Stage: Transaction setup
    [ INFO  ] Stage: Misc configuration
    [ INFO  ] Stage: Package installation
    [ INFO  ] Stage: Misc configuration
    [ INFO  ] Configuring libvirt
    [ INFO  ] Configuring VDSM
    [ INFO  ] Starting vdsmd
    [ INFO  ] Waiting for VDSM to reply
    [ INFO  ] Creating Storage Domain
    [ INFO  ] Creating Storage Pool
    [ INFO  ] Connecting Storage Pool
    [ INFO  ] Verifying sanlock lockspace initialization
    [ INFO  ] Creating Image for 'hosted-engine.lockspace' ...
    [ INFO  ] Image for 'hosted-engine.lockspace' created successfully
    [ INFO  ] Creating Image for 'hosted-engine.metadata' ...
    [ INFO  ] Image for 'hosted-engine.metadata' created successfully
    [ INFO  ] Creating VM Image
    [ INFO  ] Extracting disk image from OVF archive (could take a few minutes depending on archive size)
    [ INFO  ] Validating pre-allocated volume size
    [ INFO  ] Uploading volume to data domain (could take a few minutes depending on archive size)
    [ INFO  ] Image successfully imported from OVF
    [ INFO  ] Destroying Storage Pool
    [ INFO  ] Start monitoring domain
    [ INFO  ] Configuring VM
    [ INFO  ] Updating hosted-engine configuration
    [ INFO  ] Stage: Transaction commit
    [ INFO  ] Stage: Closing up
    [ INFO  ] Creating VM
      You can now connect to the VM with the following command:
            hosted-engine --console
      You can also graphically connect to the VM from your system with the following command:
            remote-viewer vnc://node1.supcom:5900
      Use temporary password "1485XCFX" to connect to vnc console.
      Please ensure that your Guest OS is properly configured to support serial console according to your distro documentation.
      Follow http://www.ovirt.org/Serial_Console_Setup#I_need_to_access_the_console_the_old_way for more info.
      If you need to reboot the VM you will need to start it manually using the command:
      hosted-engine --vm-start
      You can then set a temporary password using the command:
      hosted-engine --add-console-password
      Please install and setup the engine in the VM.
      You may also be interested in installing ovirt-guest-agent-common package in the VM.


      The VM has been rebooted.
      To continue please install oVirt-Engine in the VM
      (Follow http://www.ovirt.org/Quick_Start_Guide for more info).

      Make a selection from the options below:
      (1) Continue setup - oVirt-Engine installation is ready and ovirt-engine service is up
      (2) Abort setup
      (3) Power off and restart the VM
      (4) Destroy VM and abort setup

      (1, 2, 3, 4)[1]:
A partir desse ponto você precisar conectar na VM via VNC, para inciar o setup da engine.
Na minha instalação eu utilizei o Tightvnc (http://www.tightvnc.com/download.php)
Após acessar via vnc a maquina virtual, execute o seguinte comando
[root@ovirtengine ~]# engine-setup
[ INFO  ] Stage: Initializing
[ INFO  ] Stage: Environment setup
  Configuration files: ['/etc/ovirt-engine-setup.conf.d/10-packaging-jboss.conf', '/etc/ovirt-engine-setup.conf.d/10-packaging.conf']
  Log file: /var/log/ovirt-engine/setup/ovirt-engine-setup-20161118191609-oxmvpo.log
  Version: otopi-1.5.2 (otopi-1.5.2-1.el7.centos)
[ INFO  ] Stage: Environment packages setup

......................
......................

--== END OF CONFIGURATION ==--

[ INFO  ] Stage: Setup validation
[WARNING] Cannot validate host name settings, reason: cannot resolve own name 'ovirtengine'

      --== CONFIGURATION PREVIEW ==--

      Application mode                        : both
      Default SAN wipe after delete           : False
      Firewall manager                        : firewalld
      Update Firewall                         : True
      Host FQDN                               : ovirtengine.supcom
      Engine database secured connection      : False
      Engine database host                    : localhost
      Engine database user name               : engine
      Engine database name                    : engine
      Engine database port                    : 5432
      Engine database host name validation    : False
      DWH database secured connection         : False
      DWH database host                       : localhost
      DWH database user name                  : ovirt_engine_history
      DWH database name                       : ovirt_engine_history
      DWH database port                       : 5432
      DWH database host name validation       : False
      Engine installation                     : True
      NFS setup                               : False
      PKI organization                        : supcom
      Configure local Engine database         : True
      Set application as default page         : True
      Configure Apache SSL                    : True
      DWH installation                        : True
      Configure local DWH database            : True
      Engine Host FQDN                        : ovirtengine.supcom
      Configure Image I/O Proxy               : True
      Configure VMConsole Proxy               : True
      Configure WebSocket Proxy               : True

      Please confirm installation settings (OK, Cancel) [OK]: OK
Retirei parte do log padrão para não ficar muito grande o post, acima segue o resumo da minha configuração. Visto que todo ambiente será instalado nessa vm, tanto banco de dados como o DWH, então basta confirmar e seguir a configuração padrão.
[ INFO  ] Stage: Transaction setup
[ INFO  ] Stopping engine service
[ INFO  ] Stopping ovirt-fence-kdump-listener service
[ INFO  ] Stopping dwh service
[ INFO  ] Stopping Image I/O Proxy service
[ INFO  ] Stopping websocket-proxy service
[ INFO  ] Stage: Misc configuration
[ INFO  ] Stage: Package installation
[ INFO  ] Stage: Misc configuration
[ INFO  ] Upgrading CA
[ INFO  ] Initializing PostgreSQL
[ INFO  ] Creating PostgreSQL 'engine' database
[ INFO  ] Configuring PostgreSQL
[ INFO  ] Creating PostgreSQL 'ovirt_engine_history' database
[ INFO  ] Configuring PostgreSQL
[ INFO  ] Creating CA
[ INFO  ] Creating/refreshing Engine database schema
[ INFO  ] Creating/refreshing DWH database schema
[ INFO  ] Configuring Image I/O Proxy
[ INFO  ] Setting up ovirt-vmconsole proxy helper PKI artifacts
[ INFO  ] Setting up ovirt-vmconsole SSH PKI artifacts
[ INFO  ] Configuring WebSocket Proxy
[ INFO  ] Creating/refreshing Engine 'internal' domain database schema
[ INFO  ] Generating post install configuration file '/etc/ovirt-engine-setup.conf.d/20-setup-ovirt-post.conf'
[ INFO  ] Stage: Transaction commit
[ INFO  ] Stage: Closing up
[ INFO  ] Starting engine service
[ INFO  ] Restarting nfs services
[ INFO  ] Starting dwh service
[ INFO  ] Restarting ovirt-vmconsole proxy service

  --== SUMMARY ==--

[ INFO  ] Restarting httpd
  Please use the user 'admin@internal' and password specified in order to login
  Web access is enabled at:
  http://ovirtengine.supcom:80/ovirt-engine
  https://ovirtengine.supcom:443/ovirt-engine
  Internal CA 81:C1:01:AD:28:0E:46:8F:86:A8:BB:12:E9:BB:2B:5F:0E:8C:F0:8D
  SSH fingerprint: d7:7b:83:5b:54:6e:46:7b:c1:2c:c0:6e:ae:a1:4c:1e

  --== END OF SUMMARY ==--

[ INFO  ] Stage: Clean up
  Log file is located at /var/log/ovirt-engine/setup/ovirt-engine-setup-20161118192015-muij8n.log
[ INFO  ] Generating answer file '/var/lib/ovirt-engine/setup/answers/20161118192638-setup.conf'
[ INFO  ] Stage: Pre-termination
[ INFO  ] Stage: Termination
[ INFO  ] Execution of setup completed successfully
Após a finalização, vamos voltar para o node1 e selecionar a primeira opção, para finalizar.
Make a selection from the options below:
  (1) Continue setup - oVirt-Engine installation is ready and ovirt-engine service is up
  (2) Abort setup
  (3) Power off and restart the VM
  (4) Destroy VM and abort setup

  (1, 2, 3, 4)[1]: 1

Checking for oVirt-Engine status at ovirtengine.supcom...
[ INFO  ] Engine replied: DB Up!Welcome to Health Status!
[ INFO  ] Acquiring internal CA cert from the engine
[ INFO  ] The following CA certificate is going to be used, please immediately interrupt if not correct:
[ INFO  ] Issuer: C=US, O=supcom, CN=ovirtengine.supcom.60122, Subject: C=US, O=supcom, CN=ovirtengine.supcom.60122, Fingerprint (SHA-1): 81C101AD280E468F86A8BB12E9BB2B5F0E8CF08D
[ INFO  ] Connecting to the Engine
[ INFO  ] Waiting for the host to become operational in the engine. This may take several minutes...
[ INFO  ] Still waiting for VDSM host to become operational...
[ INFO  ] The VDSM Host is now operational
[ INFO  ] Saving hosted-engine configuration on the shared storage domain

  Please shutdown the VM allowing the system to launch it as a monitored service.
  The system will wait until the VM is down.
Agora vamos voltar ao ovirtengine e reiniciar a vm.
[root@ovirtengine ~]# shutdown -r now
Voltando ao node1, percebemos que a instalação finalizou com sucesso.
[ INFO  ] Enabling and starting HA services
[ INFO  ] Stage: Clean up
[ INFO  ] Generating answer file '/var/lib/ovirt-hosted-engine-setup/answers/answers-20161118174208.conf'
[ INFO  ] Generating answer file '/etc/ovirt-hosted-engine/answers.conf'
[ INFO  ] Stage: Pre-termination
[ INFO  ] Stage: Termination
[ INFO  ] Hosted Engine successfully deployed
[root@node1 ~]#
Vamos agora iniciar o hosted-engine
[root@node1 ~]# hosted-engine --vm-start
Caso a vm ovirtengine não inicie, restart os serviços
[root@node1 ~]# systemctl restart ovirt-ha-agent && systemctl restart ovirt-ha-broker && systemctl restart vdsmd
[root@node1 ~]# hosted-engine --vm-start
[root@node1 ~]# hosted-engine --vm-status

--== Host 1 status ==--

Status up-to-date  : True
Hostname   : node1.supcom
Host ID: 1
Engine status  : {"health": "good", "vm": "up", "detail": "up"}
Score  : 3400
stopped: False
Local maintenance  : False
crc32  : f322c3c1
Host timestamp : 235828
Extra metadata (valid at timestamp):
metadata_parse_version=1
metadata_feature_version=1
timestamp=235828 (Mon Nov 21 13:29:31 2016)
host-id=1
score=3400
maintenance=False
state=EngineUp
stopped=False
Agora vá para browser e acesse o portal de administração
https://ovirtengine.supcom/ovirt-engine/
login:admin
senha: que você configurou na instalação
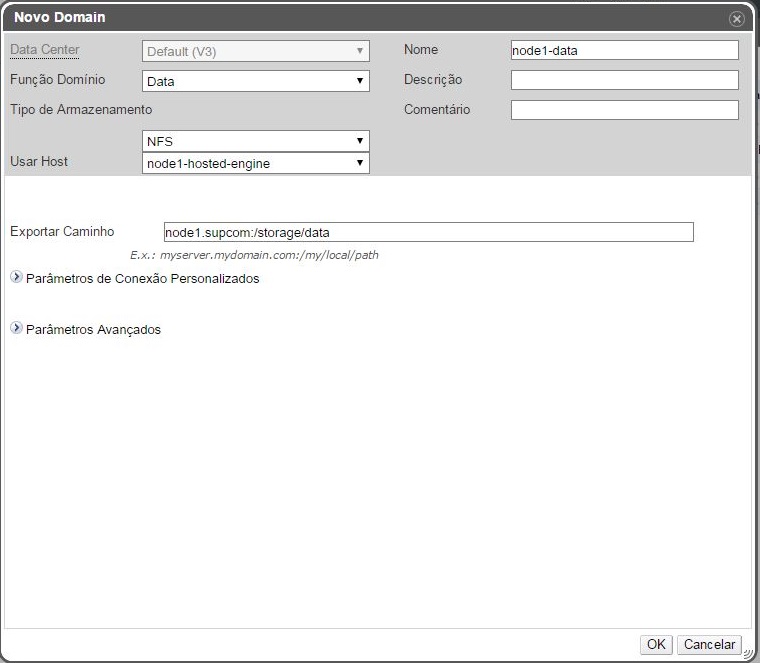
Adicionando Storage Data
Sistema -> Data Centers -> Default -> Storage -> Novo Dominio”:
Adicionando Storage ISO
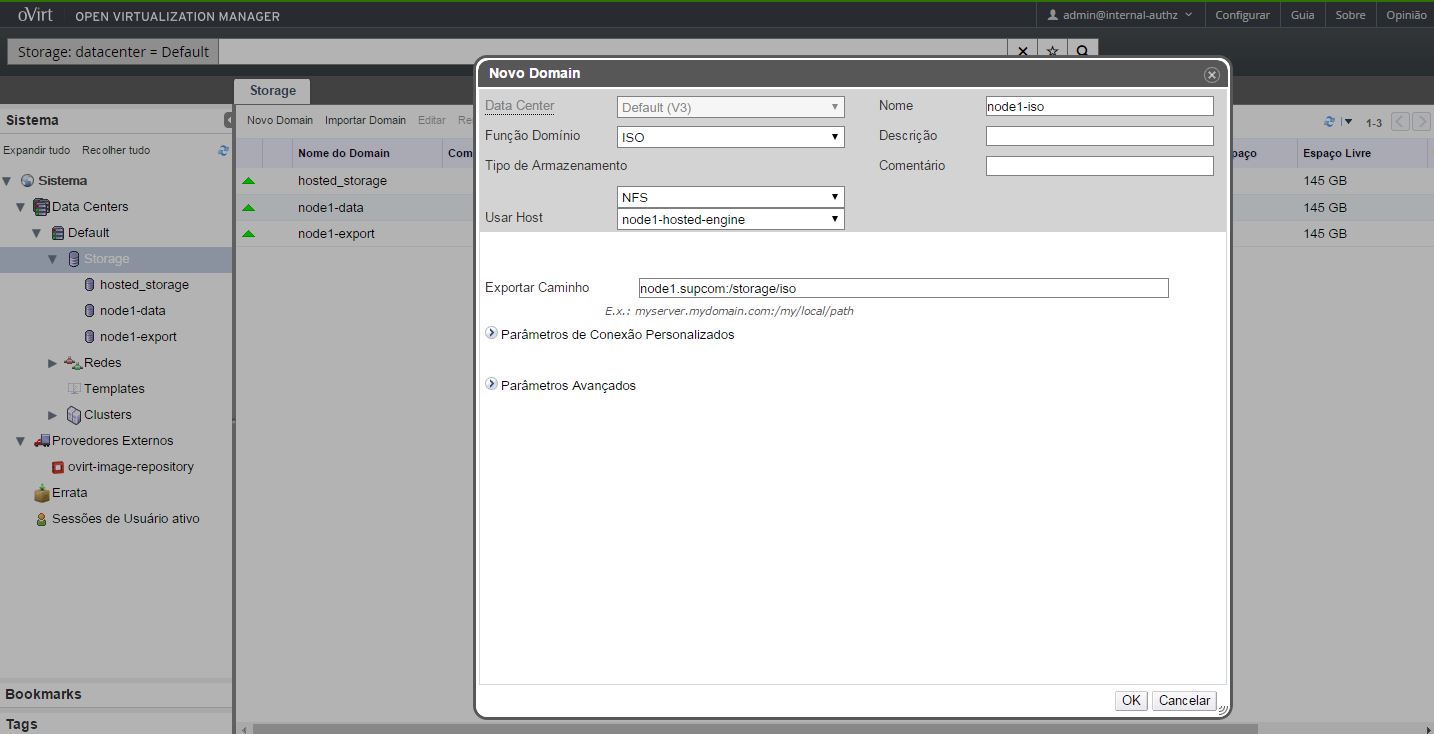
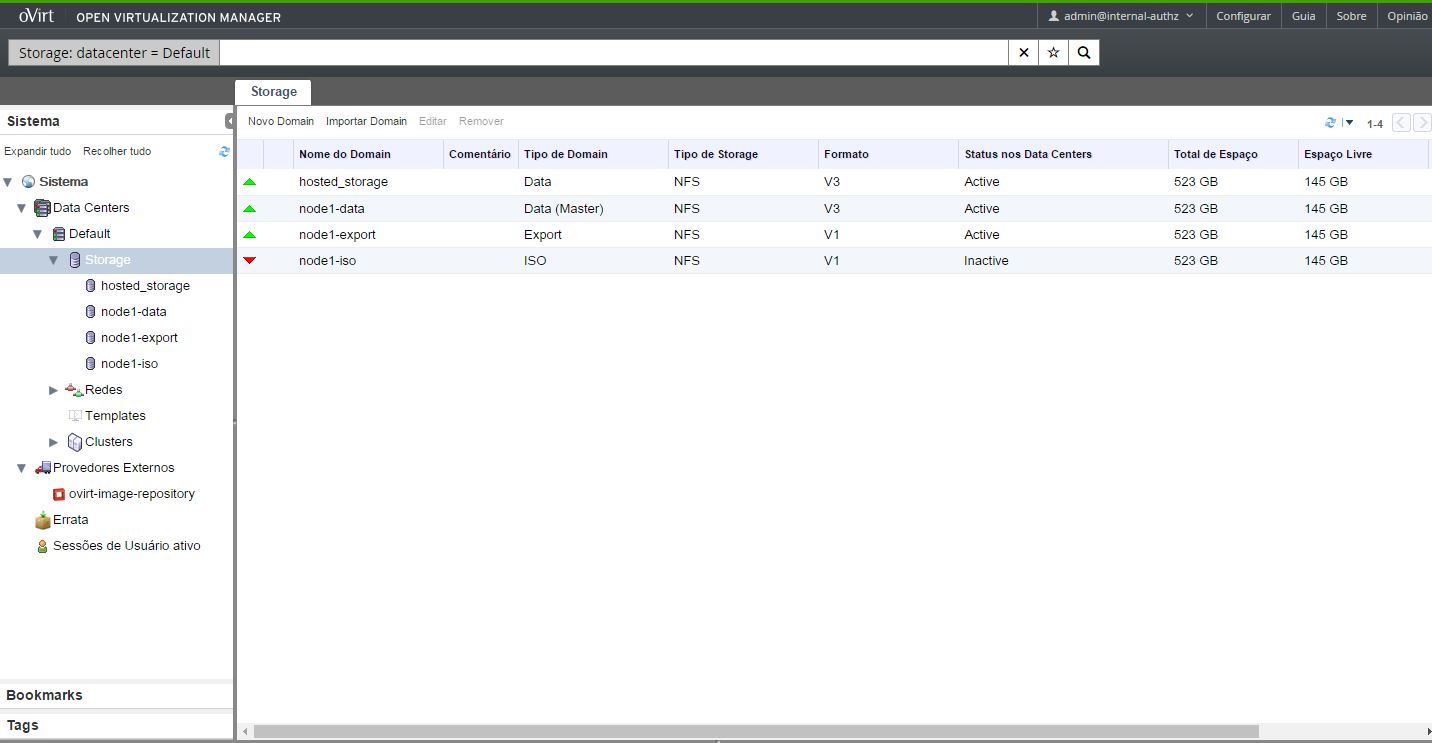
Agora basta aguarda o storage ficar ativo.

Adicionando imagem ISO no Dominio criado
Acesse o ovirtengine e digite os comandos abaixo
[root@ovirtengine ~]# wget http://mirror.globo.com/centos/7/isos/x86_64/CentOS-7-x86_64-Minimal-1511.iso

[root@ovirtengine ~]# engine-iso-uploader upload -i node1-iso CentOS-7-x86_64-Minimal-1511.iso -r ovirtengine.supcom --insecure
Please provide the REST API password for the admin@internal oVirt Engine user (CTRL+D to abort):
Uploading, please wait...
INFO: Start uploading CentOS-7-x86_64-Minimal-1511.iso
Uploading: [########################################] 100%
INFO: CentOS-7-x86_64-Minimal-1511.iso uploaded successfully
Caso receba nfs timeout verifique se o firewall do node1.supcom não está bloqueando.
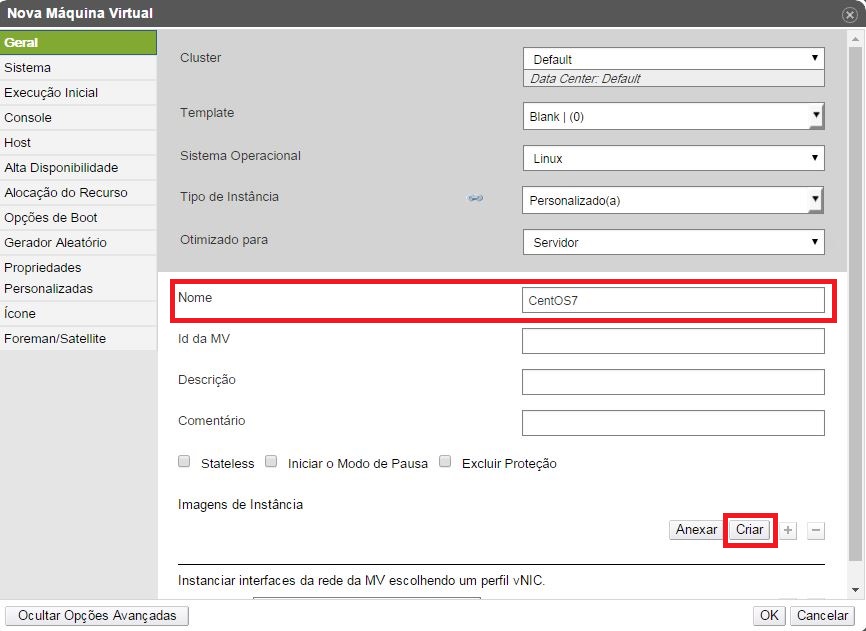
Criando VM
Sistema -> Data Centers -> Default -> Cluster -> Default - > MVS -> Novo MV”:
Após digitar o nome da VM, vamos criar o disco da VM em “Imagens de Instâncias” click em Criar
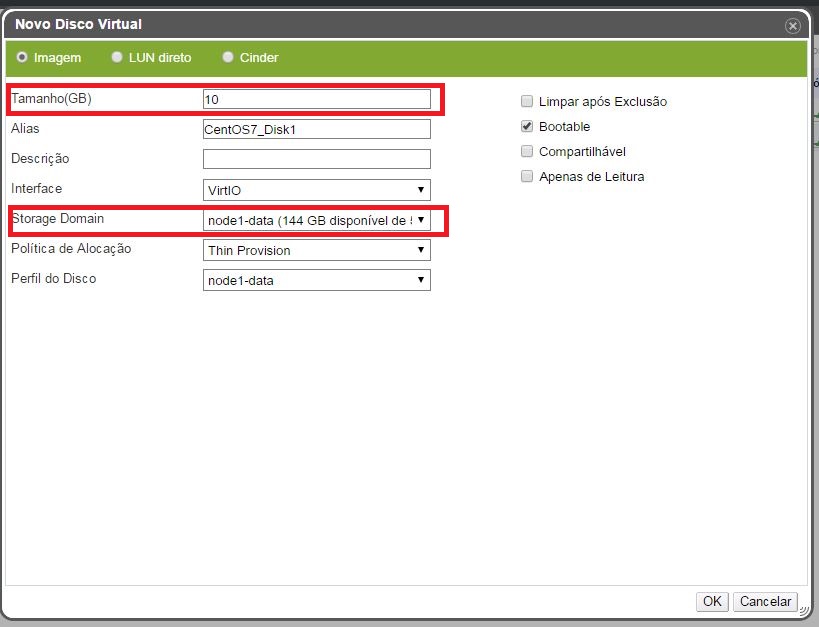
Digite o Tamanho, verifique se o storage domain está correto e click em OK
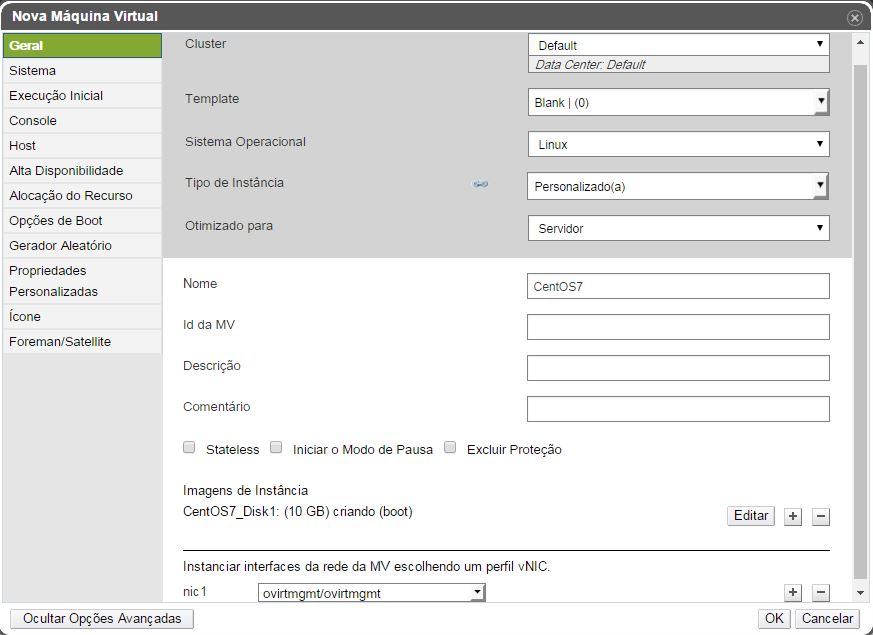
Selecione a rede que foi configurada por padrão na instalação.(bridge ovirtmgmt)
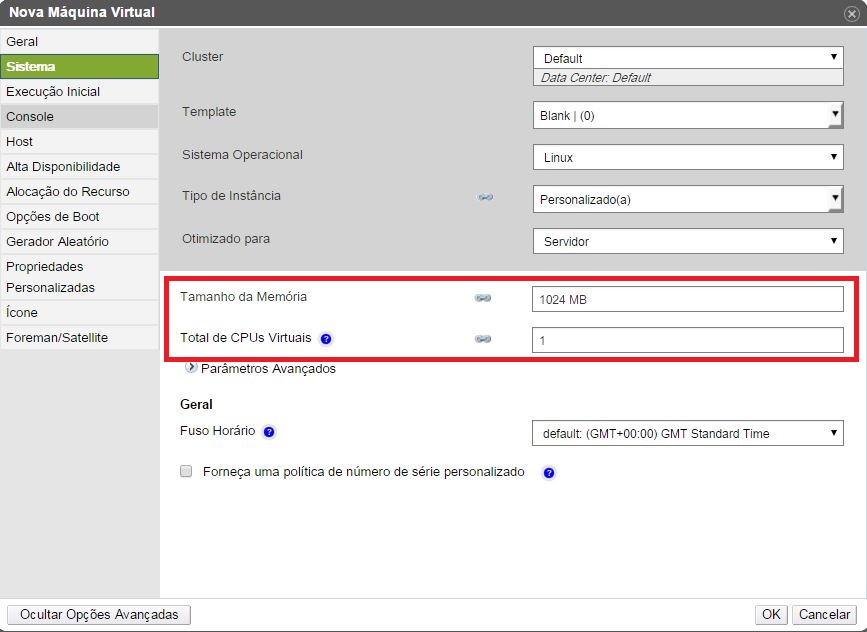
Configure a memória e o CPU e click em OK.
Agora vamos iniciar a VM clicando em “Executar uma vez” para iniciar o sistema com boot da nossa ISO CentOS

Selecione nossa ISO e marque a opção “Colocar CD”
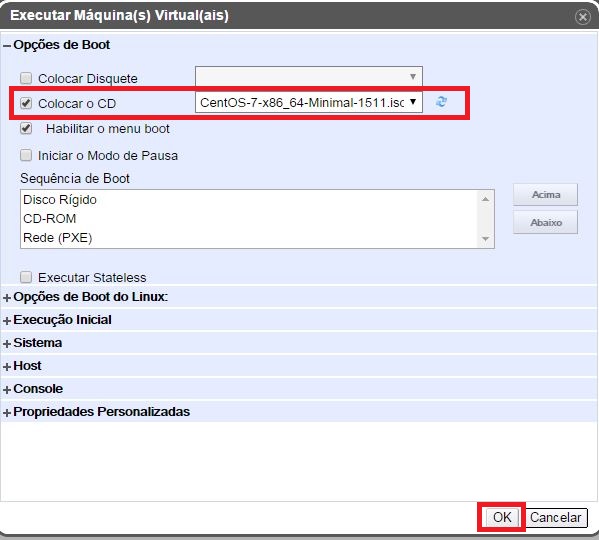
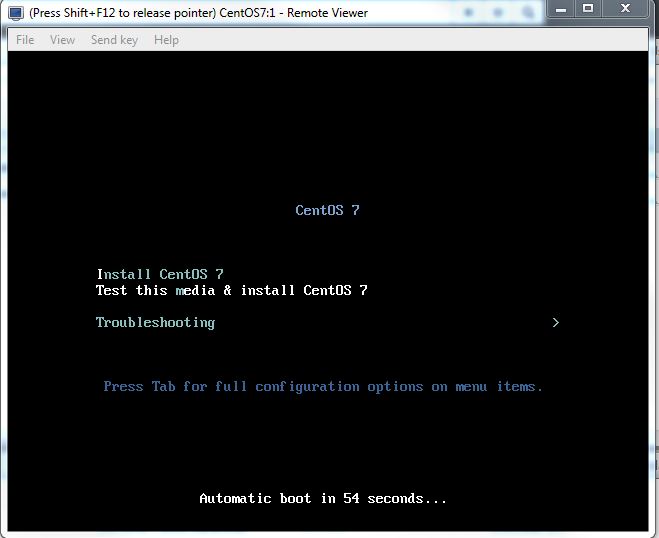
Agora vamos Abrir o Console da VM para iniciar a Instalação.

Para o Remote Viewer abrir será nescessario baixar O Virt Manager (https://virt-manager.org/download/)
Troubleshooting:
Resolvendo problema com “ Failed to acquire lock: No space left on device ” ao iniciar a vm hosted engine
[root@node1 ~]# vdsClient -s 0 list
.........
.........
exitMessage = Failed to acquire lock: No space left on device
..........
..........
[root@node1 ~]# hosted-engine --vm-poweroff
[root@node1 ~]# sanlock direct init -s hosted-engine:0:/rhev/data-center/mnt/<INTERNAL HE SD>/<SDUUID>/ha_agent/hosted-engine.lockspace:0
[root@node1 ~]# systemctl restart ovirt-ha-agent && systemctl restart ovirt-ha-broker && systemctl restart vdsmd && systemctl restart supervdsmd
[root@node1 ~]# hosted-engine --vm-start
Referência: